
I haven't done much writing about being on the trails this summer, which is an unfortunate byproduct of a lot of large writing projects eating up my attention, but the radio silence wasn't for a lack of hiking. And while I haven't been great about documenting this summer, I did manage to capture our recent trip to Banff and Jasper in video form. It was shot on a Centriphone Rig with a GoPro Hero 4.
The Year in Video (So far)
This is just a quick video I put together from my time exploring the Pacific Northwest, Canada, Hawaii and New Zealand in the past year.
Climbing Mount Doom
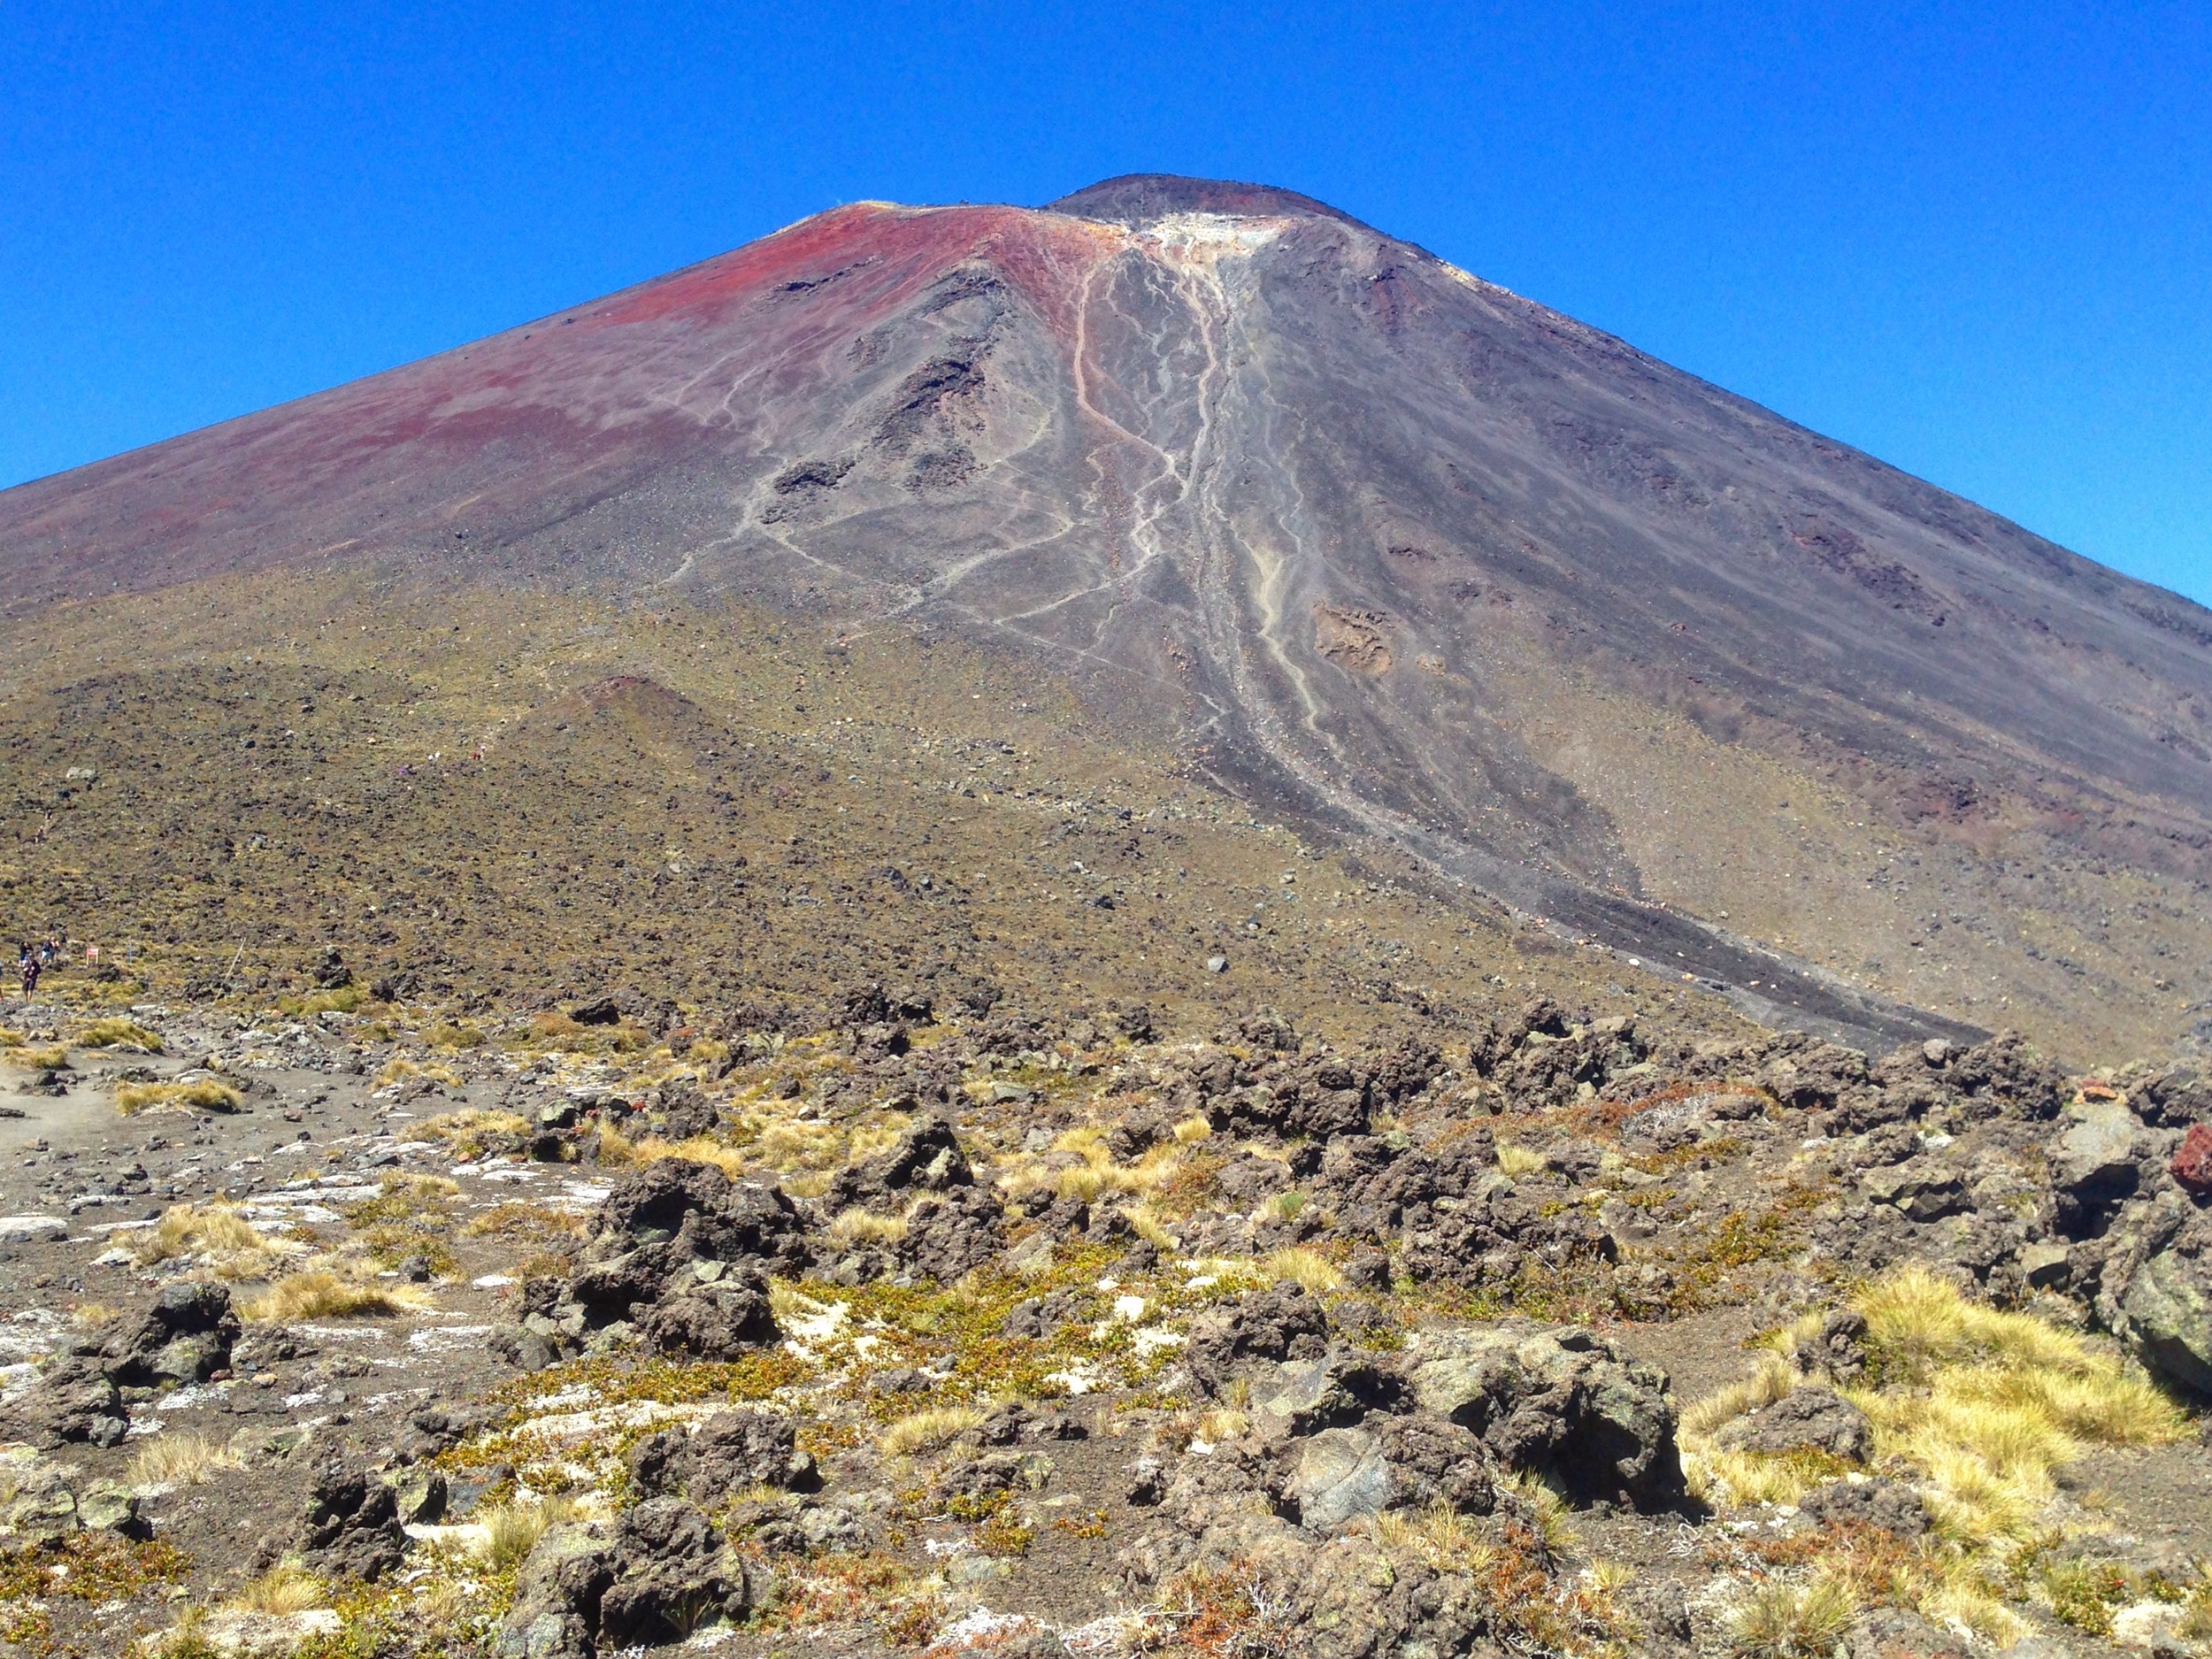
Mt. Doom (more commonly known as Mt. Ngauruhoe) is a steep, slushy, scree-riddled volcano located along the Tongariro Alpine Crossing on New Zealand’s north island. A peak where two steps forward feels like two steps backward on your slog to the interminable summit. Nonetheless, it's a hardship that seems appropriate for the task of climbing Mt. Doom. If there were gondolas up to Mt. Doom or I hiked Mt. Doom and it made me feel good about myself, it wouldn’t quite sit right with me. Mt. Doom really needs to make you hate yourself a little bit and to its credit, it did.

19.4 KM = 12ish miles, but you don't need to do all 12 miles to complete the Mt. Doom experience. You are looking at a 6-7 hour hike though.
To begin your journey up Mt. Doom you have to head to Tongariro National Park and seek out the Mangatepopo Car Park at the end of Mangatepopo Road. Climbing the peak is a detour on one of New Zealand’s most popular day hikes, the Tongariro Crossing, where trampers traverse a patch of Mordor like terrain, winding past volcanic pools, geothermic vents and lava flows in New Zealand's oldest national park. You will follow the Tongariro Crossing trail for about two hours, after which you will be given the opportunity to split from the crossing to begin the formidable chore of climbing to the top of the infamous Mt. Doom (Mt. Ngauruhoe) summit.

At the turnoff for Ngauruhoe, you're looking at about a three hour roundtrip from sign to summit back to sign.
Let’s just get this out of the way. This hike sucks at times. The déjà vu of hiking Mount St. Helens was not lost on me while I was doing this trail. And the day I attempted Mt. Doom, it was hot. Probably in the high 80s. The breeze that arrived with the elevation gain was welcome at first, but eventually just became another force of nature battering you back down the mountain as you crawled your way up its quicksand-like exterior.

Mordor-lite landscapes as far as the eye can see.
It wasn’t the museum of false summits and broken dreams that Mount St. Helens was, but as I mentioned, it’s in the same ballpark. Ngauruhoe is more akin to a compact version of Helens. You can clearly see your endpoint, even if it seems impossible to reach once you start sloshing your boots into the Mars red scree fields.

Blood red scree fields as far as the eye can see.
At some point on your climb up Mt. Ngauruhoe, it becomes apparent that the best ascent route is to abandon any sense of a path and gravitate toward the sharp volcanic rock clusters that you were previously avoiding. These razor sharp outcroppings provide something solid to pull/crawl yourself up the mountain with, even if it’s like grabbing a hand railing made of broken glass. This is the portion of the hike where gardening gloves become invaluable. Because I am an excellent planner, my gardening gloves were still in an amazon delivery box back in Seattle when I set out for Mt. Doom, having arrived the day after I left for New Zealand. Still, having climbed Mount St. Helens and seeing the aftermath it had on gloveless hands, I had a backup pair of regular gloves on hand for this climb.

No, Amazon Prime didn't let me down. I let myself down.
As I inched my way up this big dumb volcano, I saw plenty of people lose faith and give up on the quest like a bunch of Boromirs. And I don't blame them. This climb was taxing. And while I certainly wouldn't classify it as a dangerous hike, it's somewhere in the range of difficult to sketchy. Either way, the novelty of saying I climbed Mt. Doom was too powerful to really give any thought to turning around before I reached the summit. I wasn’t going to fly to New Zealand to hike some of Mt. Doom. No one would have cared if Frodo did 2/3 of Mt. Doom, buried the ring under a rock and then called for his eagle uber. So, I pushed on with my blister riddled feet, passing into the muttering stage of the hike. The muttering quickly disappeared when I finally, after a metric forever, reached the summit and turned around for one of those “oh, right,” views, where you immediately understand why people climb this mountain outside of the perceived novelty value of reaching the top of Mt. Doom. It's gorgeous.

Okay, fine. I get it. The view is awesome. This doesn't mean we're friends though, Mt. Doom.
The summit of Mt. Ngauruhoe provides a stunning panorama of the crossing, its volcanic pools dotting the landscape like translucent puddles, the clouds gliding over the plains like wistful guardians, the Neapolitan strips of farmland leaning endlessly into the horizon. It's breathtaking. Turn and peer into the massive cranial summit crater, which looks as vast and unforgiving as you’d expect from the top of Mt. Doom.
The vine equivalent of climbing Mt. Doom in a minute.
After I ate some lunch and tossed my metaphorical ring into the crater, I took a few pictures to prove I was foolish enough to climb this mountain and started back down, exhausted, but happy to have completed the task at hand. Somehow, I had managed to condense the entire plot of Lord of the Rings into a single day. I left the Shire the day before at 4pm and made the summit of mountain by 2:00 pm the next day. Eat your heart out, Frodo.
But the fun was not over yet. The mountain is so steep that the endorsed method of descending is to literally plant your feet and slide down these lightly channeled paths of rock and scree. Most of the time when you see someone unstably boot skiing down a mountain, you remind yourself to not follow any part of that soon to be seriously injured climber’s route. But in this case, it is the way to go. There are no easy outs on Mt. Doom. Much in the same way that there are no pleasant means to make your way up this mountain, there are no pleasant means of descending either. Everything must be terrible. By the time you hit level ground again, your boots with be so filled with rocks, they cease cutting into your ankles and congeal into a solid mass rock liner, becoming more of a quiet discomfort than any sharp jarring pain.

Rocks in the socks.
After you have completed your descent, make your way back to the trail split and pay close attention to retrace your path back toward the Mangatepopo Car Park. Do not proceed to the right and continue on the Alpine Crossing trail. It does not loop around to the Mangatepopo Car Park and you will find yourself stranded in another carpark, at the mercy of tour bus operators who may take pity on you and shuttle you back to your car back at Mangatepopo. I managed to finally hobble back to my beater rental in just under six hours total for the trip. All and all, it was a difficult but rewarding hike. Definitely one for the books.
Next. A quick stop in Waitomo to see the glow worm caves and then onto the south island where Christchurch and Mt. Cook await.
Mt. Doom Trip schedule:
Left car: 10:15 am
Reached turnoff for Mt. Ngauruhoe summit: 11:50 am
Summited Mt. Ngauruhoe: 1:50pm
Summit turnaround: 2:00 pm
Boot skied back to trail turnoff: 2:50 pm
Back at car: 4:00 pm
Getting there: Mangatepopo Car Park. The car park is often filled with hikers attempting the crossing, so you may have to improvise parking on the gravel road leading up to the carpark by using one of the cone designated makeshift shoulders. Prepare yourself for the possibility of adding anywhere from a quarter mile to a half mile walk to your trekking plans. After locating parking, you will follow the Tongariro Crossing for about two hours, after which you are given the opportunity to split from the crossing to take on Mt. Ngauruhoe. The signage for this trail is very thorough, so as long as you pay close attention, it should be a relatively intuitive route.
Stray Observations:
- Listening to the LOTR soundtrack while climbing Mt. Doom is the way to go. Howard Shore put on a masterclass with that soundtrack.
- Staying at the Plateau Lodge National Park Village before my Mt. Doom run was one of my favorite accommodations on the trip. It's nothing extravagant, just a small family run lodge with paper thin walls, the best Kiwi accents around and a great community kitchen, but I got to hop in a hot tub and soak my butchered feet when i got there, so it gets a glowing recommendation from me.
- One does not simply walk into Mordor. They drive two to three hours from Hobbiton to get there. Just in case you were wondering.

There and Back Again: Visting Hobbiton

So secretly or not so secretly, one of the major driving forces for getting me to New Zealand has always been my love of the Lord of the Rings movies. Peter Jackson’s trilogy essentially introduced me to the north and south islands and sparked my initial interest in the country. And even though there were computer generated flourishes added to New Zealand’s many natural landmarks in the movies, it did very little to diminish the actual grandeur of these locations when you see them without cinematic alteration. Mt. Doom, Isenguard, Rivendale, Edoras. All these places exist in some form in New Zealand. The country has a palette of landscapes so diverse that it can pretty much double for any terrain needed for a fantasy epic like LOTR.
“In a hole in the ground there lived a hobbit...”
But for me the one location that has always tugged at my wanderlust, calling me to the southern hemisphere has also been one of its simplest. Hobbiton. The idyllic bucolic lifestyle of the Hobbits appealed to me as a sort of perfect sleepy agrarian utopia where the tenants till the land, regularly have elevenses and second breakfastes, and find cause to celebrate even the most trivial events. It's basically an Amish community where everyone drinks a lot and doesn’t wear shoes.
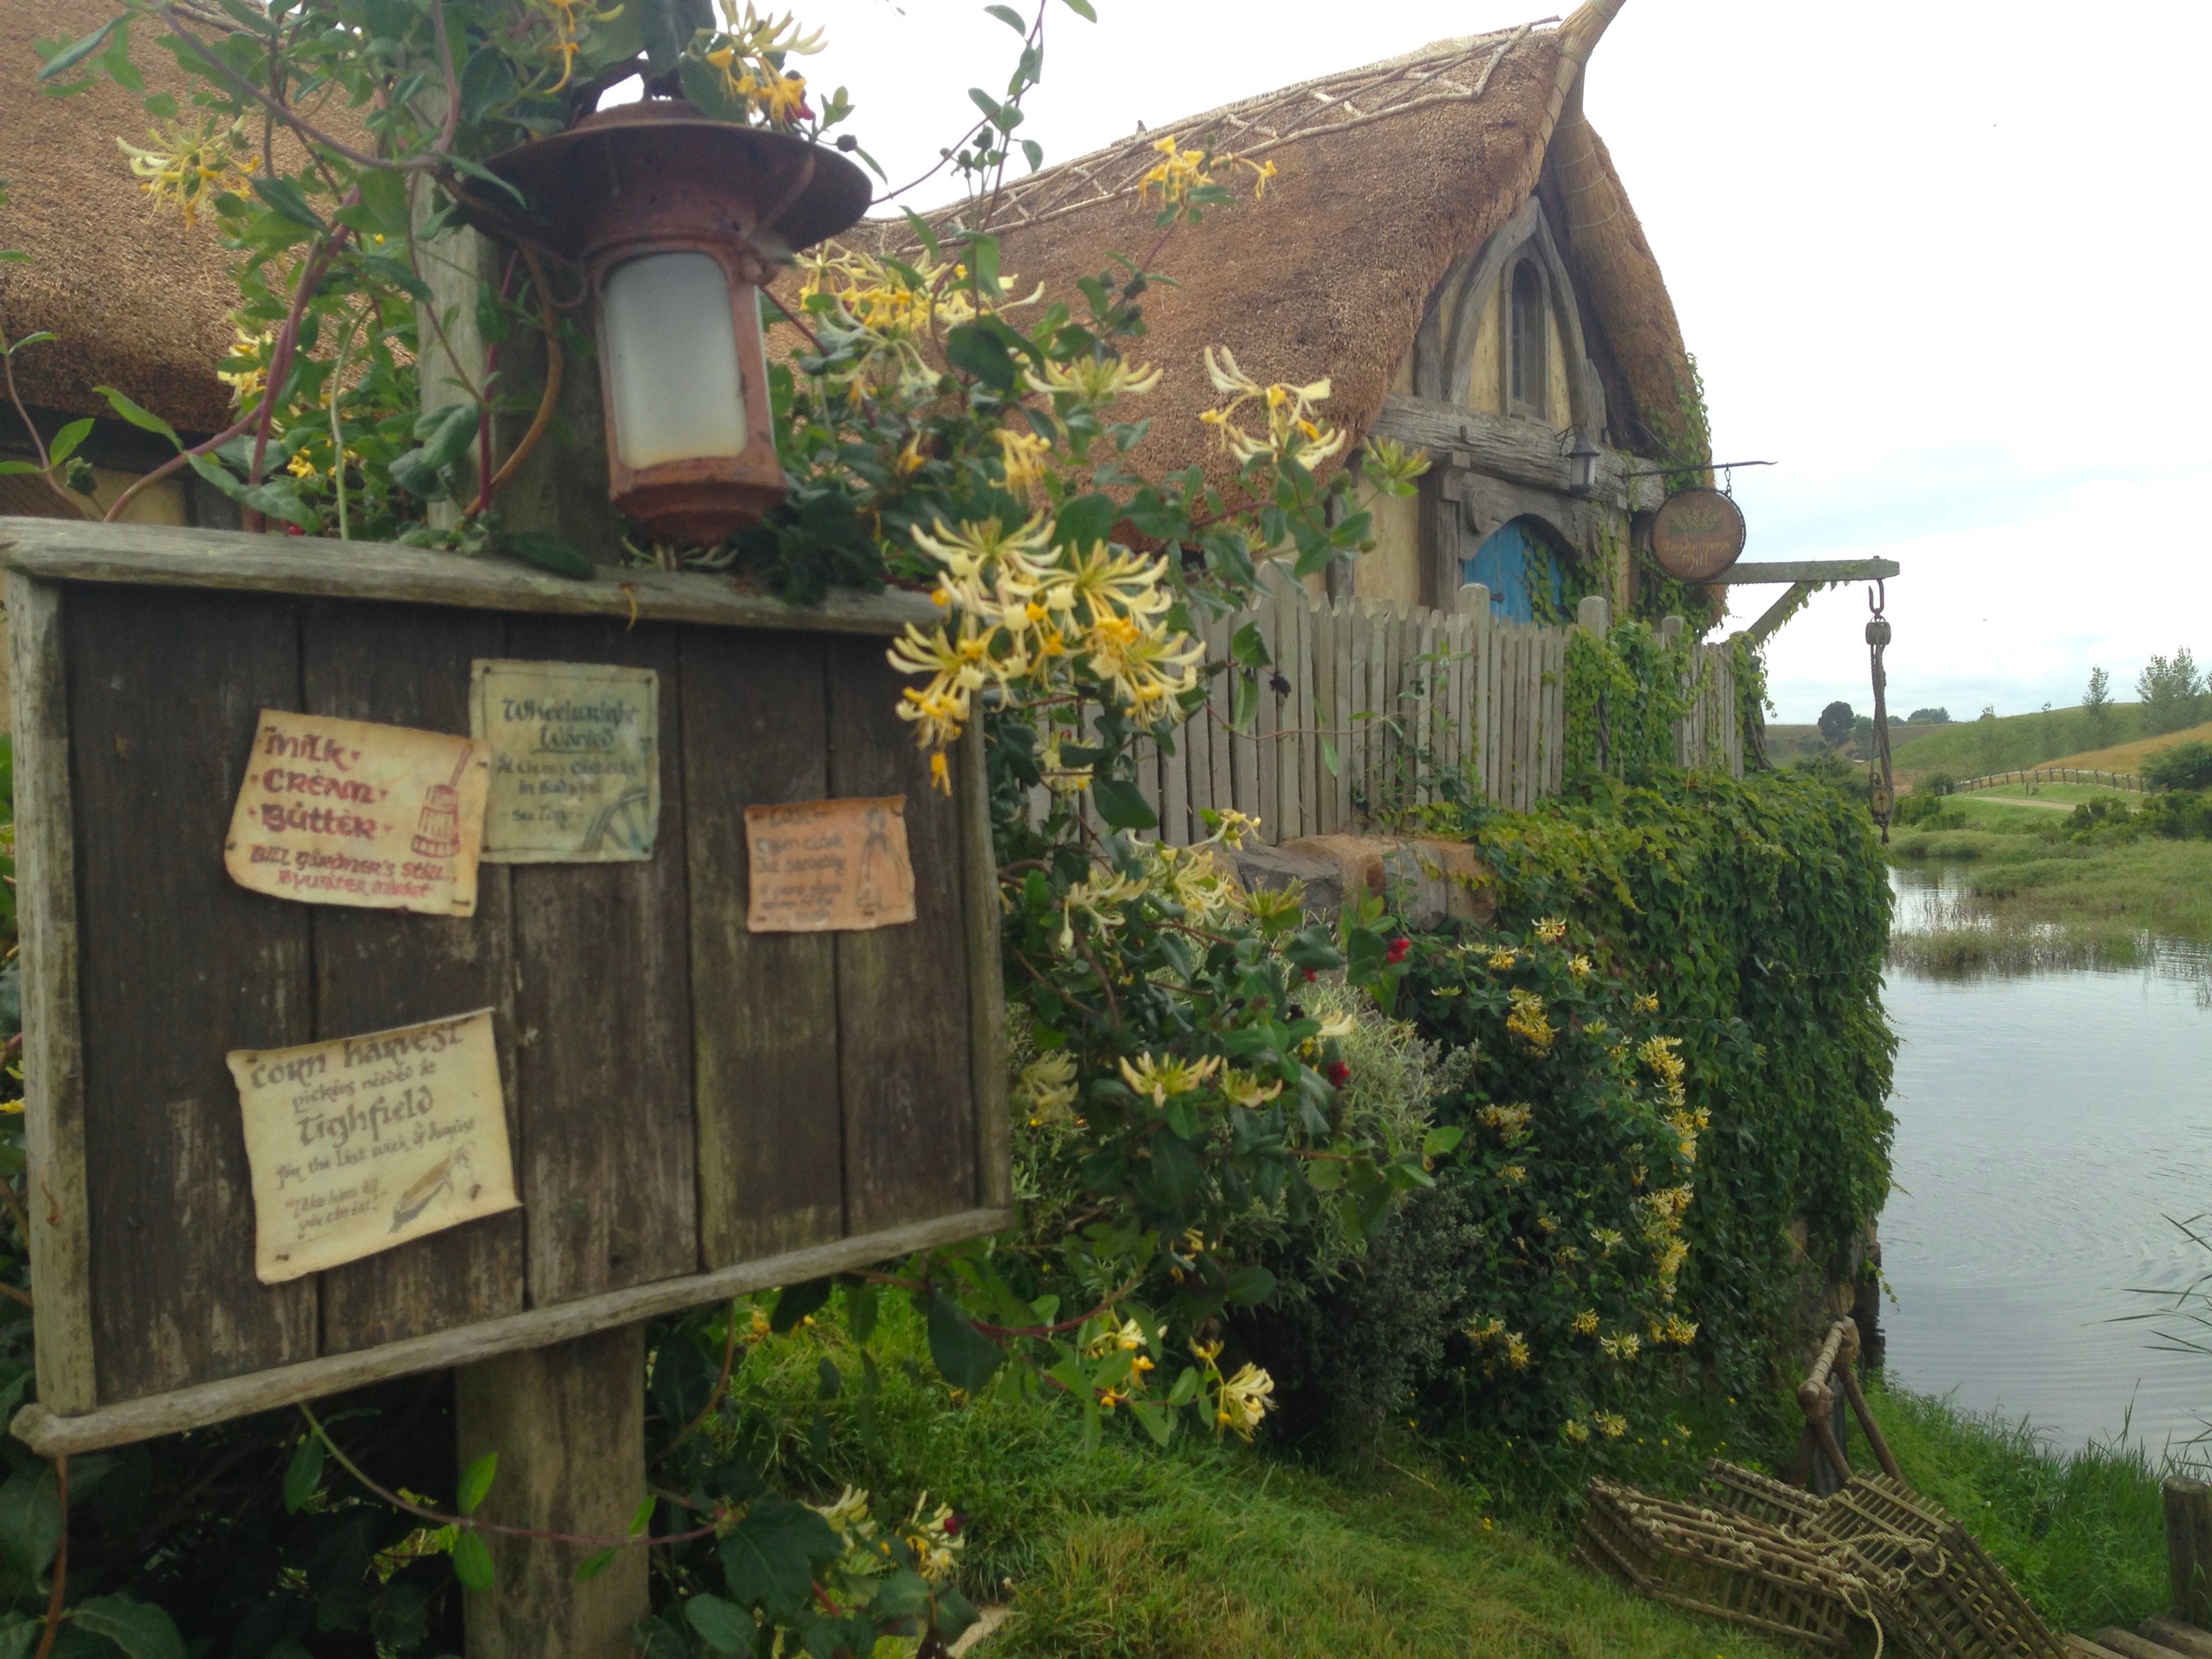
Bulletin board down at the old mill.
So when I learned that Hobbiton actually existed beyond the film sets in Peter Jackson’s Wellington based WETA facility and could be visited by the general public, I knew I had to go. Hobbiton is my mecca, at least until they build the Mos Eisley Cantina (which they strangely enough actually appear to be building). The movie set is located in Matamata, a small farming town located about two hours south of Auckland, tucked deep into the countryside amongst the endlessly green rolling hills of the north island and the wandering masses of grazing livestock that occupy them.

Because the set is on privately owned land, you can only access it through a tour that departs from about ten minutes away at The Shire’s Rest. You can also start tours from Matamata or Auckland, but I’d recommend driving to the Shire’s Rest if you have a car, as it is the most convenient starting point. The Shire’s Rest is the main hub for the attraction and has a café and a well stocked (but expensive) gift shop where you can douse your travel budget with gasoline and watch it burn as you load up on more Hobbit merch than you could possibly fit in your suitcase, all while you wait for your tour to depart.

All sorts of expensive things you don't need but can't resist...besides, it's in NZ dollars. I'm sure after you convert $165 NZ, it can't be more than $20 or $30 US*....right?... *(It's actually $110 US, so it's still expensive)
Once you are loaded onto your bus, you pass through a locked gate and your tour begins. Winding down the road we were lucky enough to catch the owner of the farm herding his sheep down the road by motorbike while his sheep dog trotted along, nipping at any strays that fell out of line. It was a nice touch to kick off the tour, a sort of contemporary vignette of what you expected to see down the road. And after a few quick bends down the road and a brief general history and overview of the farm, you finally arrive at your destination. Hobbiton.

Departing the bus, I saw the wreathed Hobbiton sign and immediately felt a nostalgic gawkiness wash over me. It reminded me of going to Disneyland as a kid. The sort of experience where you plod along the entire time with a stupid grin plastered on your face, making any subsequent pictures taken of you unusable because of your inelegant look.

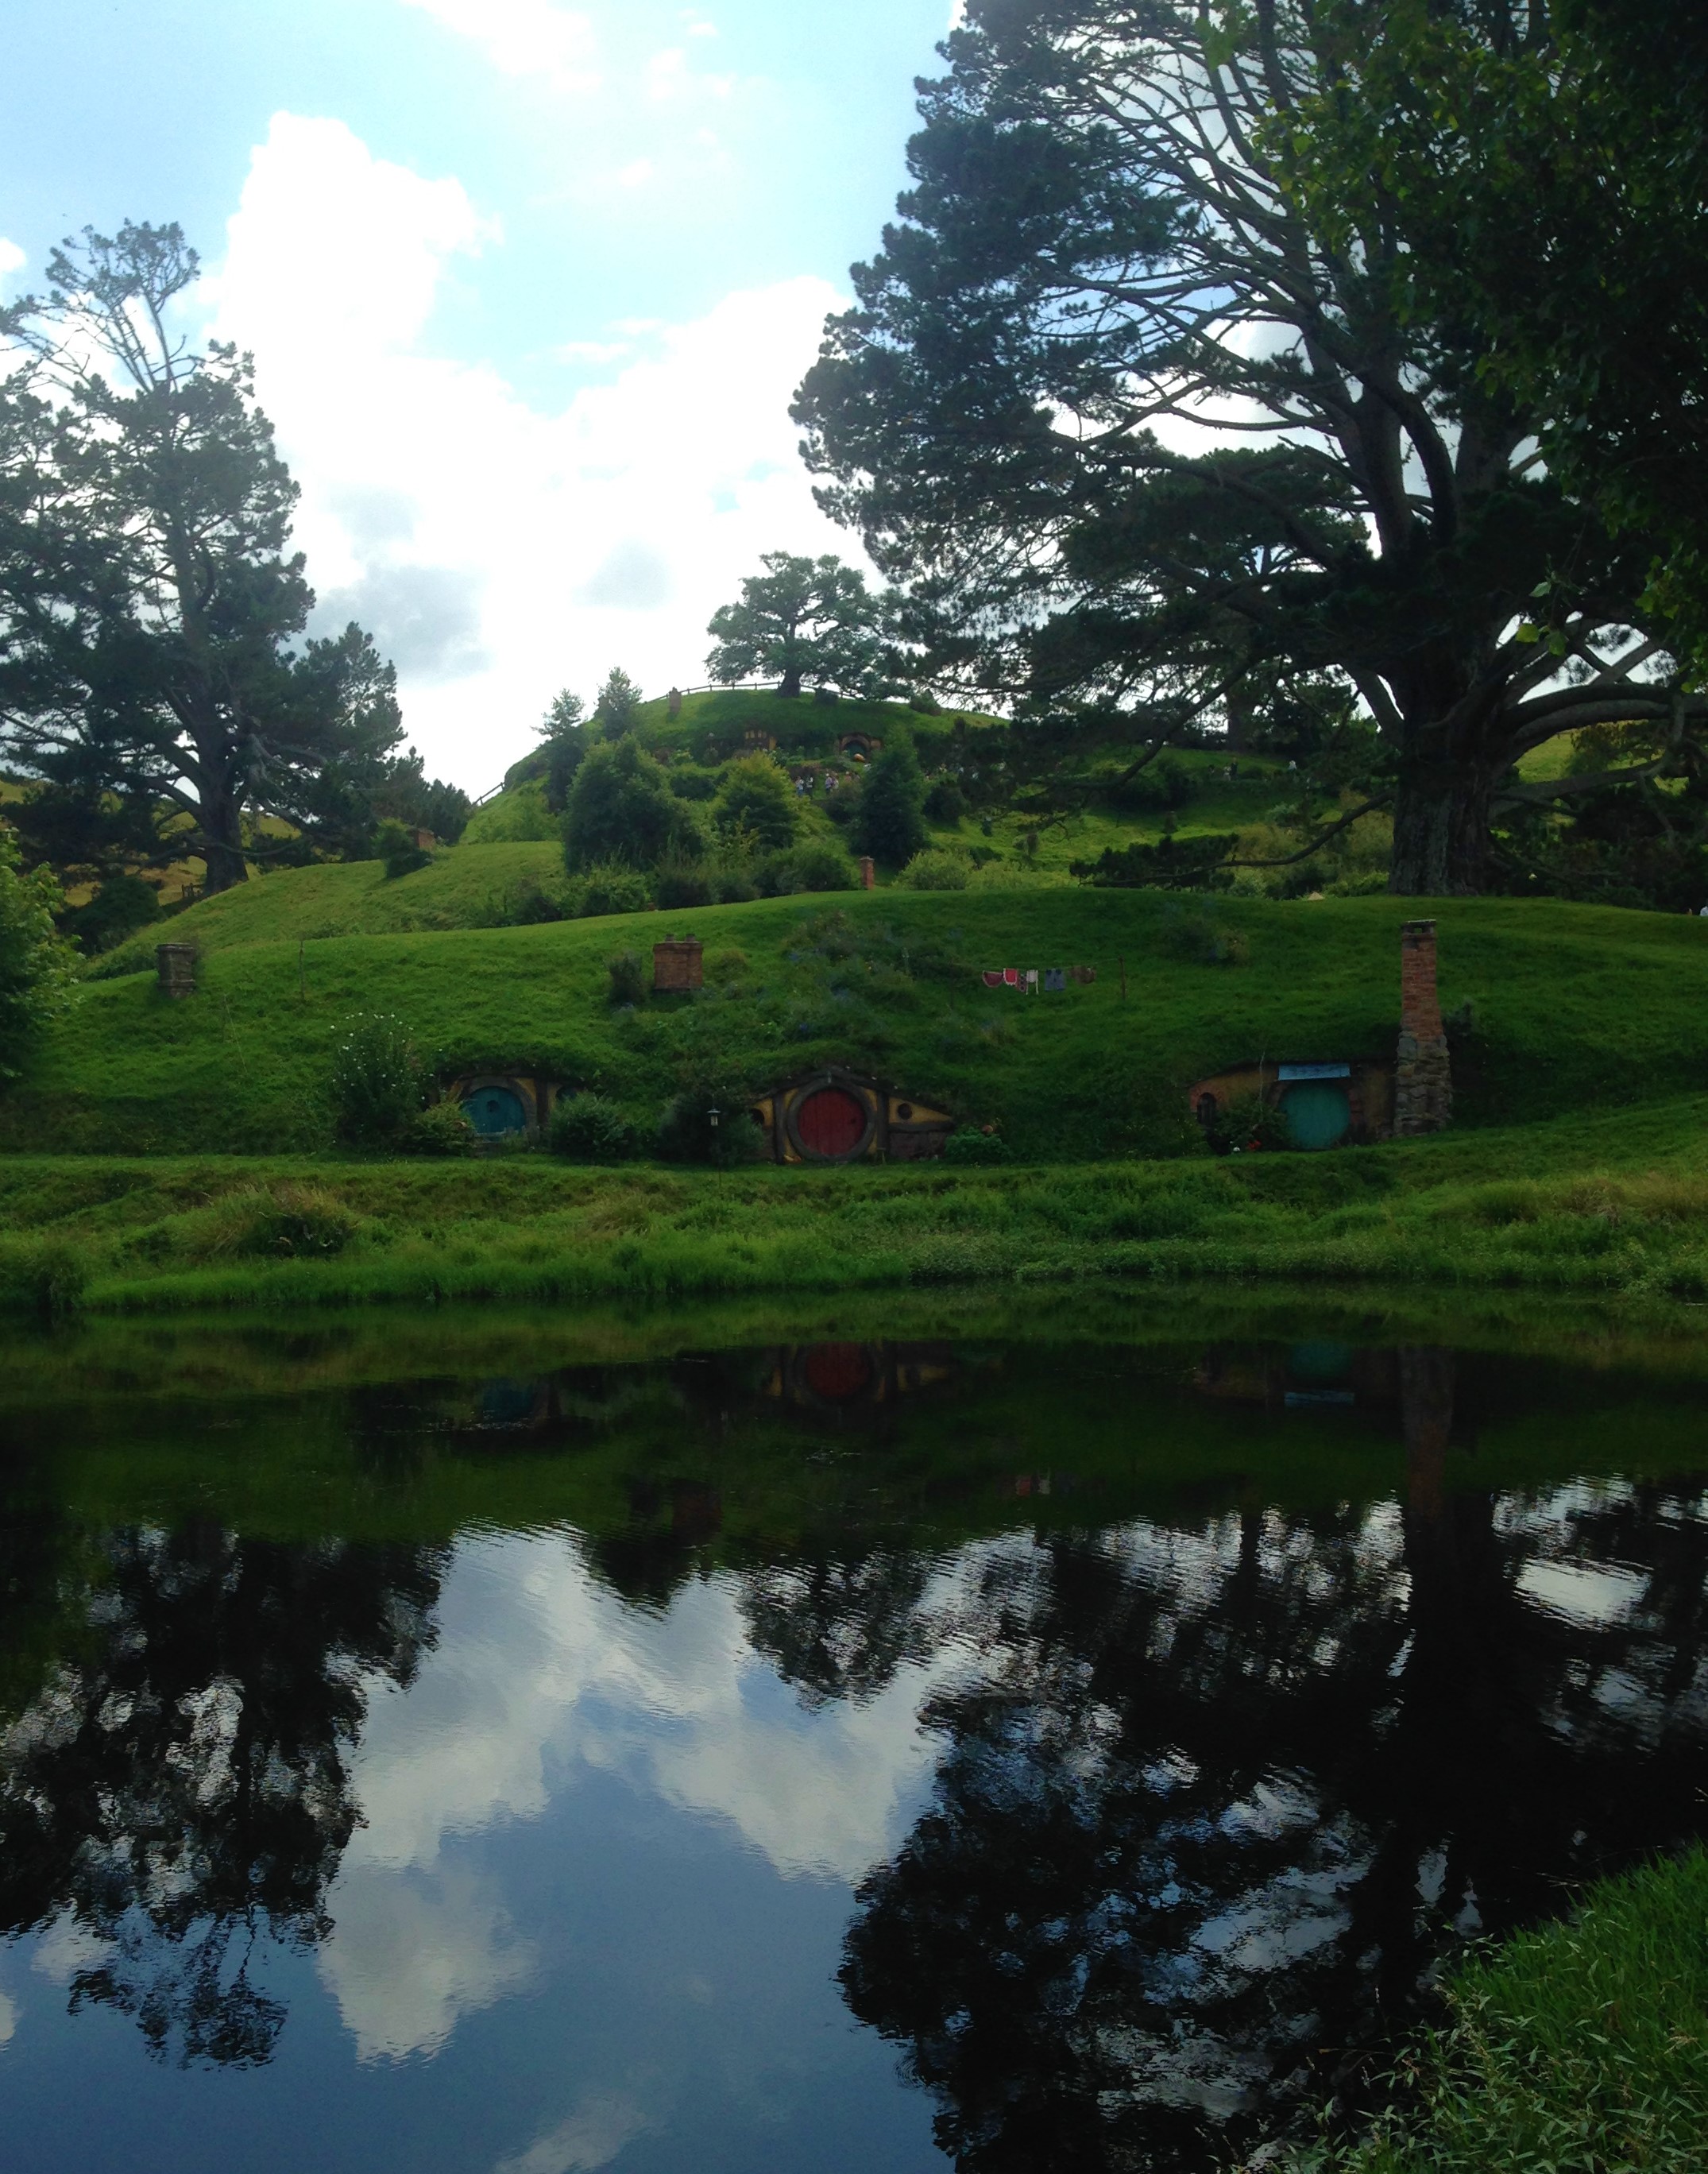
And Hobbiton did not disappoint. It was filled with pleasant surprises. I thought at most the grounds would be Bag End, the Green Dragon and a few other shoddily propped up Hobbit house fronts, but I was wrong. It far surpassed my expectations in that respect. There were over fifty intact Hobbit home fronts (none of them are functional in the sense that you can go inside, but the exteriors are so meticulously crafted and maintained that you can’t help but feel that this is a real living, breathing village) and a sizable grounds staff sprinkled around the shire, tending to the gardens, changing clotheslines and touching up the paint on the doors.
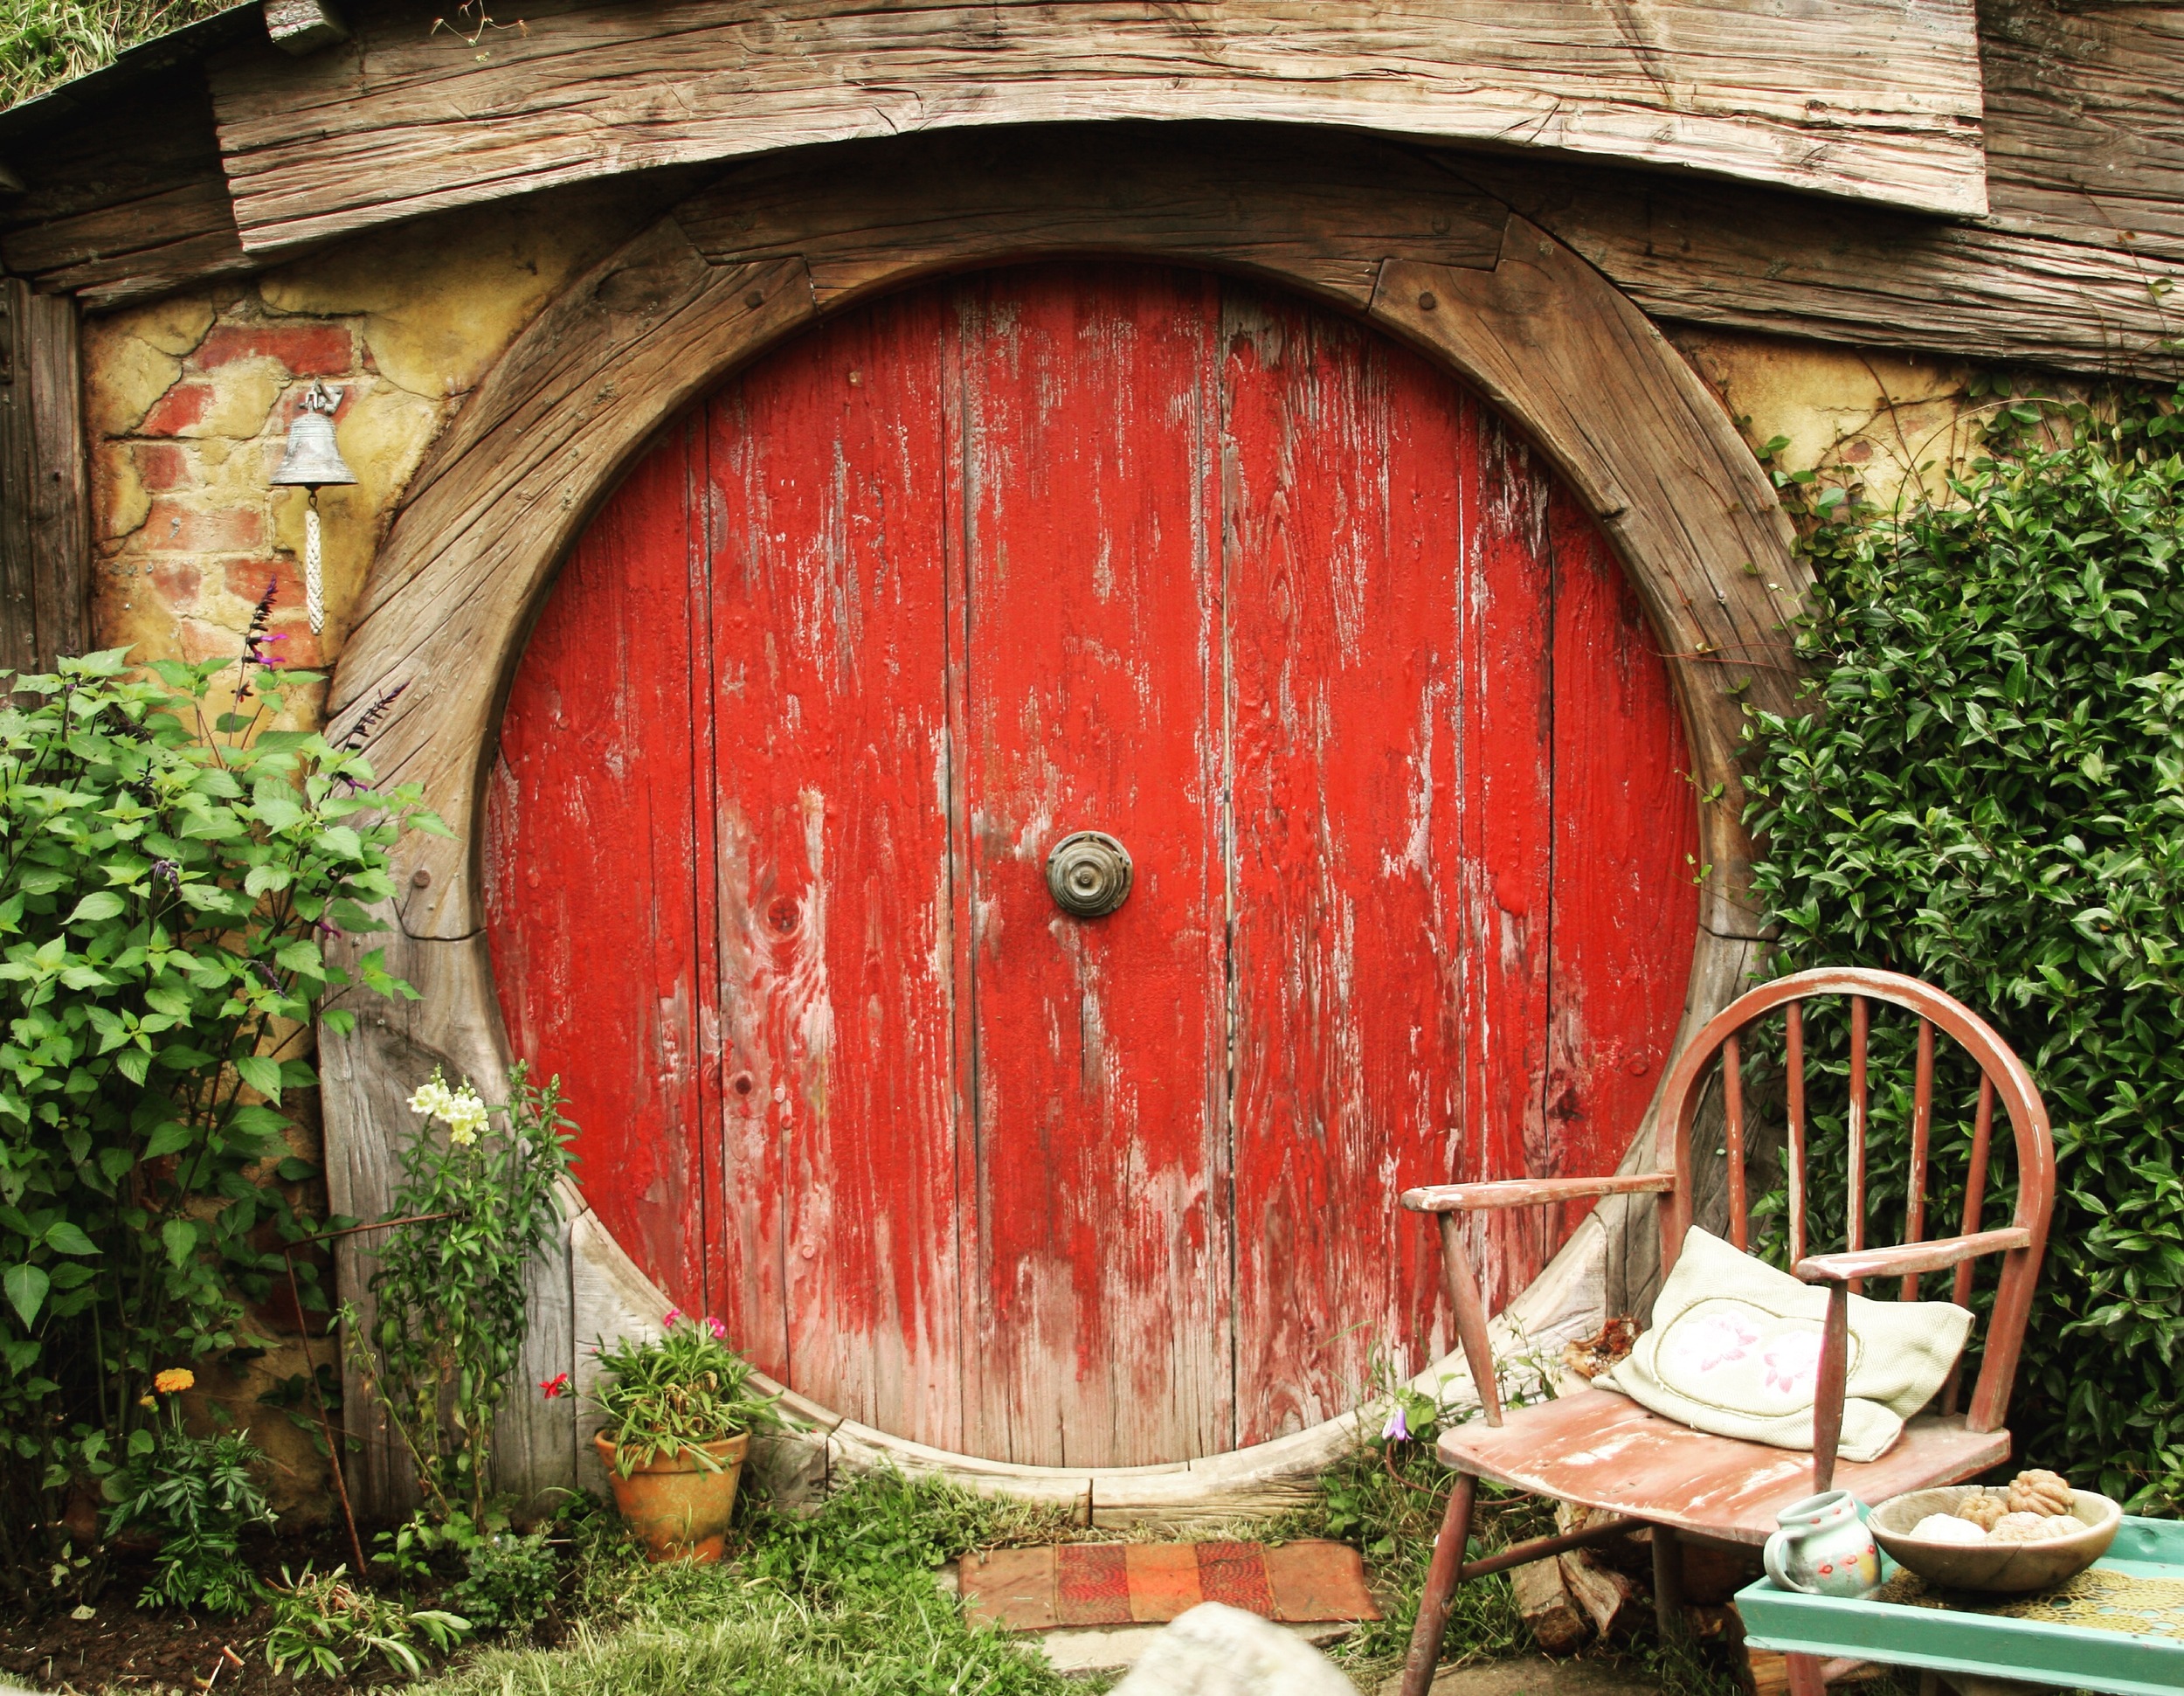
One of the many Hobbit doors.
It’s an impressive operation. Along with the existence of Bag End, I was excited to see the Gamgee estate with its iconic trilogy ending yellow door, the celebration grounds for Bilbo’s birthday and a functional Green Dragon tavern (the Green Dragon is an especial delight, where you can enjoy pints of shire brewed ale and even rent out the tavern for private events).

The Gamgee estate.
Even with the Hobbit movies out of theaters and interest arguably waning for the franchise, Hobbiton is still packed with tourists and the upkeep of the grounds reflects the demand. There is not a shoddy corner, nook or alcove on the grounds. They’ve done a superb job with the upkeep and maintenance. And the tours were especially informative. I consider myself at least a mild Rings nerd and I still learned a lot that day. So, if you’re on the fence about visiting Hobbiton, do it. I mean, it’s the Shire, man. Come on.

The board at the Green Dragon.
All and all, Hobbiton was easily one of my favorite stops in New Zealand. I loved every second of it. It's not just a quick cash grab tourist site. It's the real deal.
Next stop. Mount Doom to destroy rings of power and wreck my feet even more! Onward!
Stray observations:
- Originally when they constructed the shire sets for the original LOTR movies, they built them with materials that were not meant to last and tore them down after finishing principle photography. It wasn’t until Jackson shot the Hobbit movies seven years later that the crew erected a Hobbiton that could withstand the elements and linger as a sustainable location that could be visited. So, you may not like the Hobbit movies, but you can thank them for the existence of a tourable Shire. But yes, while we’re on the subject, Battle of the Five Armies was pretty terrible. There, there. I know.
- 95% of the greenery and gardens you see in Hobbiton are real, tended patches of land. That’s pretty cool. The other 5 % are mostly objects that have been exaggerated and manipulated beyond natural means for the purpose of scale. The most notable is the tree that stands atop Bag End. Once upon a time in the LOTR trilogy, it was a real arboreal object, but for the Hobbit they were forced to fashion a fake tree, painstakingly hand tying each individual leaf to the branches. The reasoning being that they needed a much younger looking tree for flashbacks in the Hobbit that predated the LOTR shots of the Bag End. Now that’s dedication to the details, folks.
- I want to be a gardener at Bag End. Seriously. How do I get that job? I’m willing to take a pay cut and relocate.
- I know many people disliked, tolerated or simply shrugged off the first Hobbit movie, but I actually enjoyed it quite a bit because of the large portions where they revisited Hobbiton. There was a lot of grumbling that these sections were slow, stuffed with too much exposition, character introductions and frivolous sing-songy compositions, and they’re not wrong, but I would have watched a whole movie of Bilbo going to buy fish at the market. I know, it’s weird.
- I didn't get to take it, but I hear the private evening lantern lit tour of Hobbiton is supposed to be a must. It even includes dinner at the Green Dragon.
Surviving the Kalalau Trail in One Day

The scenic Na Pali coast. Capturer of hearts. Destroyer of feet.
When I Initially booked a weekend layover in Kauai to break up the long commute to New Zealand, it was partially inspired by the opportunity to hike the Kalalau Trail. I had recently become obsessed with Kalalau after seeing it on a few must hike lists (some of which also happened to be most dangerous trails lists, but let’s not dwell on that) and hearing about it on some hiking blogs where it was discussed in hushed tones like some mythic bit of American trail lore.
Roundtrip, the trail is 22 miles (and 5,000 feet of elevation gain) of treacherous sea cliffs, winding canyons and towering waterfalls perched along Kauai’s Na Pali coast. Kalalau’s hazards can be traced to its angry coastal tides, sketchy stream crossings, flash floods, narrow sea cliff paths with dangerously distracting views, unpredictable weather, and a transient community that once threw a tourist off a cliff (the varying hazards are documented in exaggerated fashion in the guilty pleasure, one too many twists for its own good 2009 thriller A Perfect Getaway).
The Kalalau Trail is the very definition of a bad warmup. Especially when you are about to embark on a long hiking trip. Kalalau is a blister producer. Shoe obliterator. Eater of gear (my trail running bag and camera stabilizer were amongst my trail casualties on the hike). It is the trail you hike when you want to swear off physical activity and wear sweatpants for the rest of the month. Don't get me wrong. Kalalau is still a stunning once in a lifetime experience that I would recommend to anyone without a moment's hesitation, but it’s not a great way to start a three week hiking tour of New Zealand from a wear and tear perspective.

And yet, here I am. Stubborn as ever.
Most rational people hike the eleven miles to the trail’s conclusion (which dead ends in the Kalalau beach), camp for a few days and then hike back out along the same eleven miles they came in by. Splitting it into two eleven mile stretches is still challenging with a heavy pack, but incrementally it's a more reasonable commute. Some sage souls even stop at one of the earlier campsites along the way and cut the initial eleven miles into even smaller chunks. Then there is a special brand of crazy who run/walk in and run/walk out all in the same day. Of course, not having the time to camp in this short weekend visit, I found myself reluctantly vying to be part of the exclusive 1-day club.
The main problem with the 1-day club is that all the accounts of the feat come from ultra runners, trail crazies, iron men, crossfit junkies, track superstars who can't let their glory days go, and people who look suspiciously like they are sponsored by redbull. Some of which have even reported sub five hours times for completing all twenty two miles of the trail, which to me is madness. I know this is only mini marathon length, but you still have to contend with the elevation gain (see below) and whole stretches of the trail that are far too narrow and dangerous to run in good conscience.

The common misconception is that Kalalau is a flat, low elevation trail since it is hemmed in by the coast. Unfortunately, this isn't the case. The reality of the situation is that you are often going to find yourself climbing, winding and diving through the numerous coastal canyons (I've read that the elevation gain ends up being similar to doing a rim to crater roundtrip jaunt in the Grand Canyon to give you some perspective). I jogged five or six miles on the way in, but the rest of the trail just seemed too unsafe to navigate on the run. Skidding or slipping can be bad news on Kalalau. I had one slip where I was momentarily distracted by what I thought were falling rocks above me, got my feet tangled as a result, and the subsequent skid toward the sea cliff ledge in front of me was accompanied by a fair bit of internal profanity and thankfully a quick stop to my forward momentum. There is no confusion as to why this trail claims lives (the video below gives you an idea of the generally sketchiness of the trail).
Either way, after reading about the one day feat of completing the whole trail, I knew it was possible. Maybe not the endorsed way of experiencing Kalalau, but it was still possible. So I started training a few months before my trip to at least give the Na Pali mini marathon a shot. I am by no means an ultra runner, but I do have a few things going for me. I have a decent conditioning base from hiking at home in Washington. I have long legs, which mean long strides. I am stubborn to a fault (I know, these reasons are getting progressively flimsier. This is clearly devolving into an attempt to justify a series of poor decisions. Stay with me). And I also told a few people that I was going to attempt to finish it in a day. I'm sure we all know the completely irrational pressure to finish something once we've voiced it aloud to the world and it materializes as common knowledge. Was all this going to be enough to hike Kalalau in one day though? Well, there was only way to find out.
It is encouraged that you get to the trailhead before 9:00am to find parking. I got there a little after 10:00am on Sunday and while the main lot was full, I was still able to find parking in an overflow lot less than a quarter mile from the trail head. So, parking was still available in the late morning, but it was also Super Bowl Sunday which might have skewed the turnout, especially with the broadcast time in Hawaii listed at a fairly early 1:30pm.

Well, whoopty-tah, the trailhead!
Departing from the trailhead, the path was clogged with bikini clad day hikers, feet sheathed in cheap dollar stores flip flops, enviously burdened only with the weight of disposable plastic water bottles and 10-quart coolers rattling with beer for the beach (there are painfully few opportunities to pass the glacial foot traffic in the first mile, courtesy of the narrow paths and sheer drop offs on the shoulders of the trail, so more than likely you will not set your best split times on the first mile if you're running this gauntlet). This pedestrian logjam continues until you reach the two mile mark at Hanakapi’ai Beach, where permits are required to hike beyond (I had purchased a permit for the day even though I didn't intend to camp. If you don't have a permit or lose it, fines can be hefty, reaching up to $500 with a mandatory court appearance).
After the two mile mark, traffic thins out and you are left only with the serious backpackers and the long-term Kalalau super chill beach bum camper/squatter types with names like Koko Moco (actual name encountered on the trail) who sometimes carry nothing more than library totes, gas station aviators and scraggily unkempt Jim Morrison looks. Everyone I encountered on the trail was disarmingly pleasant though, and I found this was really true of all my time in Kauai. People are generally very warm and welcoming.
And how could they not be when they live in a place like this?
I had to skip the Hanakapi’ai Falls detour (a popular two mile diversion to a secluded but beautiful 800 foot waterfall) due to time constrains and an unwillingness to stack another four miles on top of the bloated twenty two mile sandwich of a hike I was already in store for. I hear Hanakapai'ai is absolutely worth the trip if you have the time and energy for it though. Pushing past the falls turnoff you really start to see the scope of what you are about to take on. You catch glimpses of the Na Pali coast in the first two miles, but it really starts to open up once you leave the crowds behind.
There's a trail somewhere around here.
Mile three is also the steepest climb you’ll have on your way to Kalalau beach, gaining almost 1,000 feet during that stretch, but you will be quickly rewarded with the best views yet. Lush canyons, turbulent seas and Point Break waves slide into view, betraying the coast's unforgiving reputation. It's not long before the towering Hanakoa waterfall appears in your periphery and goats stumble from the jungle brush to challenge you for trail grazing rights on the path. Thankfully these goats seem less aggressive than the gore happy mountain goats I've encountered back home in the Olympic Mountains, so the Kalalau goats tend to scatter if you shoo them down the trail.

Trail goats!
Continuing down the coast, the middle stretch of the trail tends to be relatively innocuous until you run into Kalalau's sketchiest section at mile 7, the aptly named Crawler’s Ledge. This is the most extreme example of the narrow paths you will encounter as you are forced to shuffle precisely along a sea ledge that if mismanaged will eject you into the sea with great ease (again, not the world's safest trail).

Approaching Crawler's Ledge. I guess this is a path, sure....
Once you've successfully navigated Crawler’s Ledge and a few subsequent precarious pathways, you will enter the home stretch. This is where you really get your second wind. You plunge downward, cutting through the slack of a few crimson colored coastal dunes.

The red dunes mean you're close. Don't give up hope!
And after a few minutes navigating the dunes, you finally glimpse the reward for all your hard work. The elusive Kalalau Beach.

Finally. Kalalau beach. 11-miles in the books. Feet only partially destroyed at this point.
I sprinted down to the beach and arrived at 2:35pm, clocking a respectable four and a half hour trip in through a selective combination of running/power hiking. The beach was gorgeous, but it was also surprisingly barren. And in a place this scenic and well known, it's troubling to you find yourself as the lone attendee. I began to worry that all the campers had cleared out with the knowledge of some ominous tidal event heading toward the Na Pali coast (or were just watching the Superbowl on portable tvs in a cave somewhere). Thankfully a pair of scantily clad campers told me that the ghost town look of Kalalau was a recent development stemming from a raid two days ago by park rangers. They had booted whole communities of squatters and cracked down on a few illegal side businesses that had popped up (including a guy on a jet ski who was charging $125 to take people back to the trailhead, which as crazy as it sounds, is an offer I might have considered if he was still in business when I got there).

Some day I will return to camp on Kalalau and do some serious napping/reading on this beach.
I thanked them for the info, snapped some pictures to memorialize/prove I was dumb enough to do this in a day and turned around to head back at 2:50pm, racing the fading daylight. The way back was obviously more difficult, but I still felt pretty good, even ignorantly cocky about the whole affair until about mile fifteen. That was the breakdown stretch, where huge blisters magically appeared on both my feet. Those last six or seven miles were honestly pretty miserable. It was a near repeat of coming down Mt. Saint Helens in ninety degree heat, but just slightly less miserable. Even though Kalalau is twice as long and as steep, Helens remains the misery king. Undefeated in all competitions.
I felt a bit dead by the time I finally stumbled back to the car at 8:50pm. It was easily one of the best hikes I’ve ever done, but it was apparent that this trail was not designed to be hiked in a day (at least not comfortably). It's not a safe trail to begin with, but especially not when your legs are tired and your strides start getting sloppy. Everyone on the trail told me I was crazy to attempt the one day loop, and in the end, they were right. Especially as a solo hiker. So, if you're going to attempt Kalalau, take your time, get permits to camp and cut the trail up into comfortable, leisurely sections. If you do, it will be the hike of a lifetime. It still was for me, but I could have done without the last couple of delirious, mumble filled hours.
22 miles and 5,000 feet of elevation gain in the books. On to Auckland! Bring on the Kiwis!
Kalalau Trailhead location: Kuhio Hwy, Hanalei, HI 96714
Trail info: Kalalau Trail official site
Trip stats: 22 miles roundtrip, 5,000 feet of elevation gain, 10 hours 50 minutes travel time.
Level of difficulty: Scenically difficult/Supremely sketchy/Highly memorable
Stray observations from the Kalalau Trail:
This should not be done in a day. Seriously, people are crazy. I don't understand people and I am one.
Everyone I met on the trail was very friendly, helpful and often naked.
Water on the Kalalau trail is found in its numerous stream crossings including the two, four, six, eight and ten mile markers (consult this handy map for specific water source locations). Make sure to bring some form of filtration or water treatment supplies if you are heading out for more than a quick day hike. Not treating or filtering your water can lead to sickness.
Composting toilets are found at the two, six and eleven mile markers on the Kalalau trail. Remember to pack out any trash that you accumulate while you are enjoying the Na Pali Coast. Consult the Kalalau trail website to learn more helpful Faqs for your trip.
I’m honestly surprised there isn’t an orientation of sorts for people who hike the trail, just to cut down on accidents. I'm not necessarily advocating for more hand holding or supervision. I like the adventurous element to the hike, but it does seem like there are a lot of people underestimating the difficulty of the hike and the dangers of getting caught out on the trail after dark.
Speaking of being caught out after dark, headlamps should be in all packs regardless of how long you plan to be on the trail. Having hiked back in the dark for an hour or so, it would have been a disaster without a headlamp. I can’t stress this enough. But this is really my rule for hiking on any trail. Headlamps should always be in packs.
Gear Check:
Trail running pack
3L Platypus
Backup Vapur water bottle
GoPro Hero 4
Dried Mango, dried peas
Lifestraw (water filter)
Headlamp and extra batteries
Sun block
Bug spray
Emergency kit and blister pads
Para cord aka backup laces
Tylenol
Rain gear
Cubs hat
Bandana
Gear I really should have had in my pack: Other than a Jetski? Duct Tape. The zipper on my bag popped at the trail head and Duct Tape would have been huge. I was carefully finessing things out of my bag the whole trip. It was not my favorite thing.
Day 1: Waimea Canyon State Park
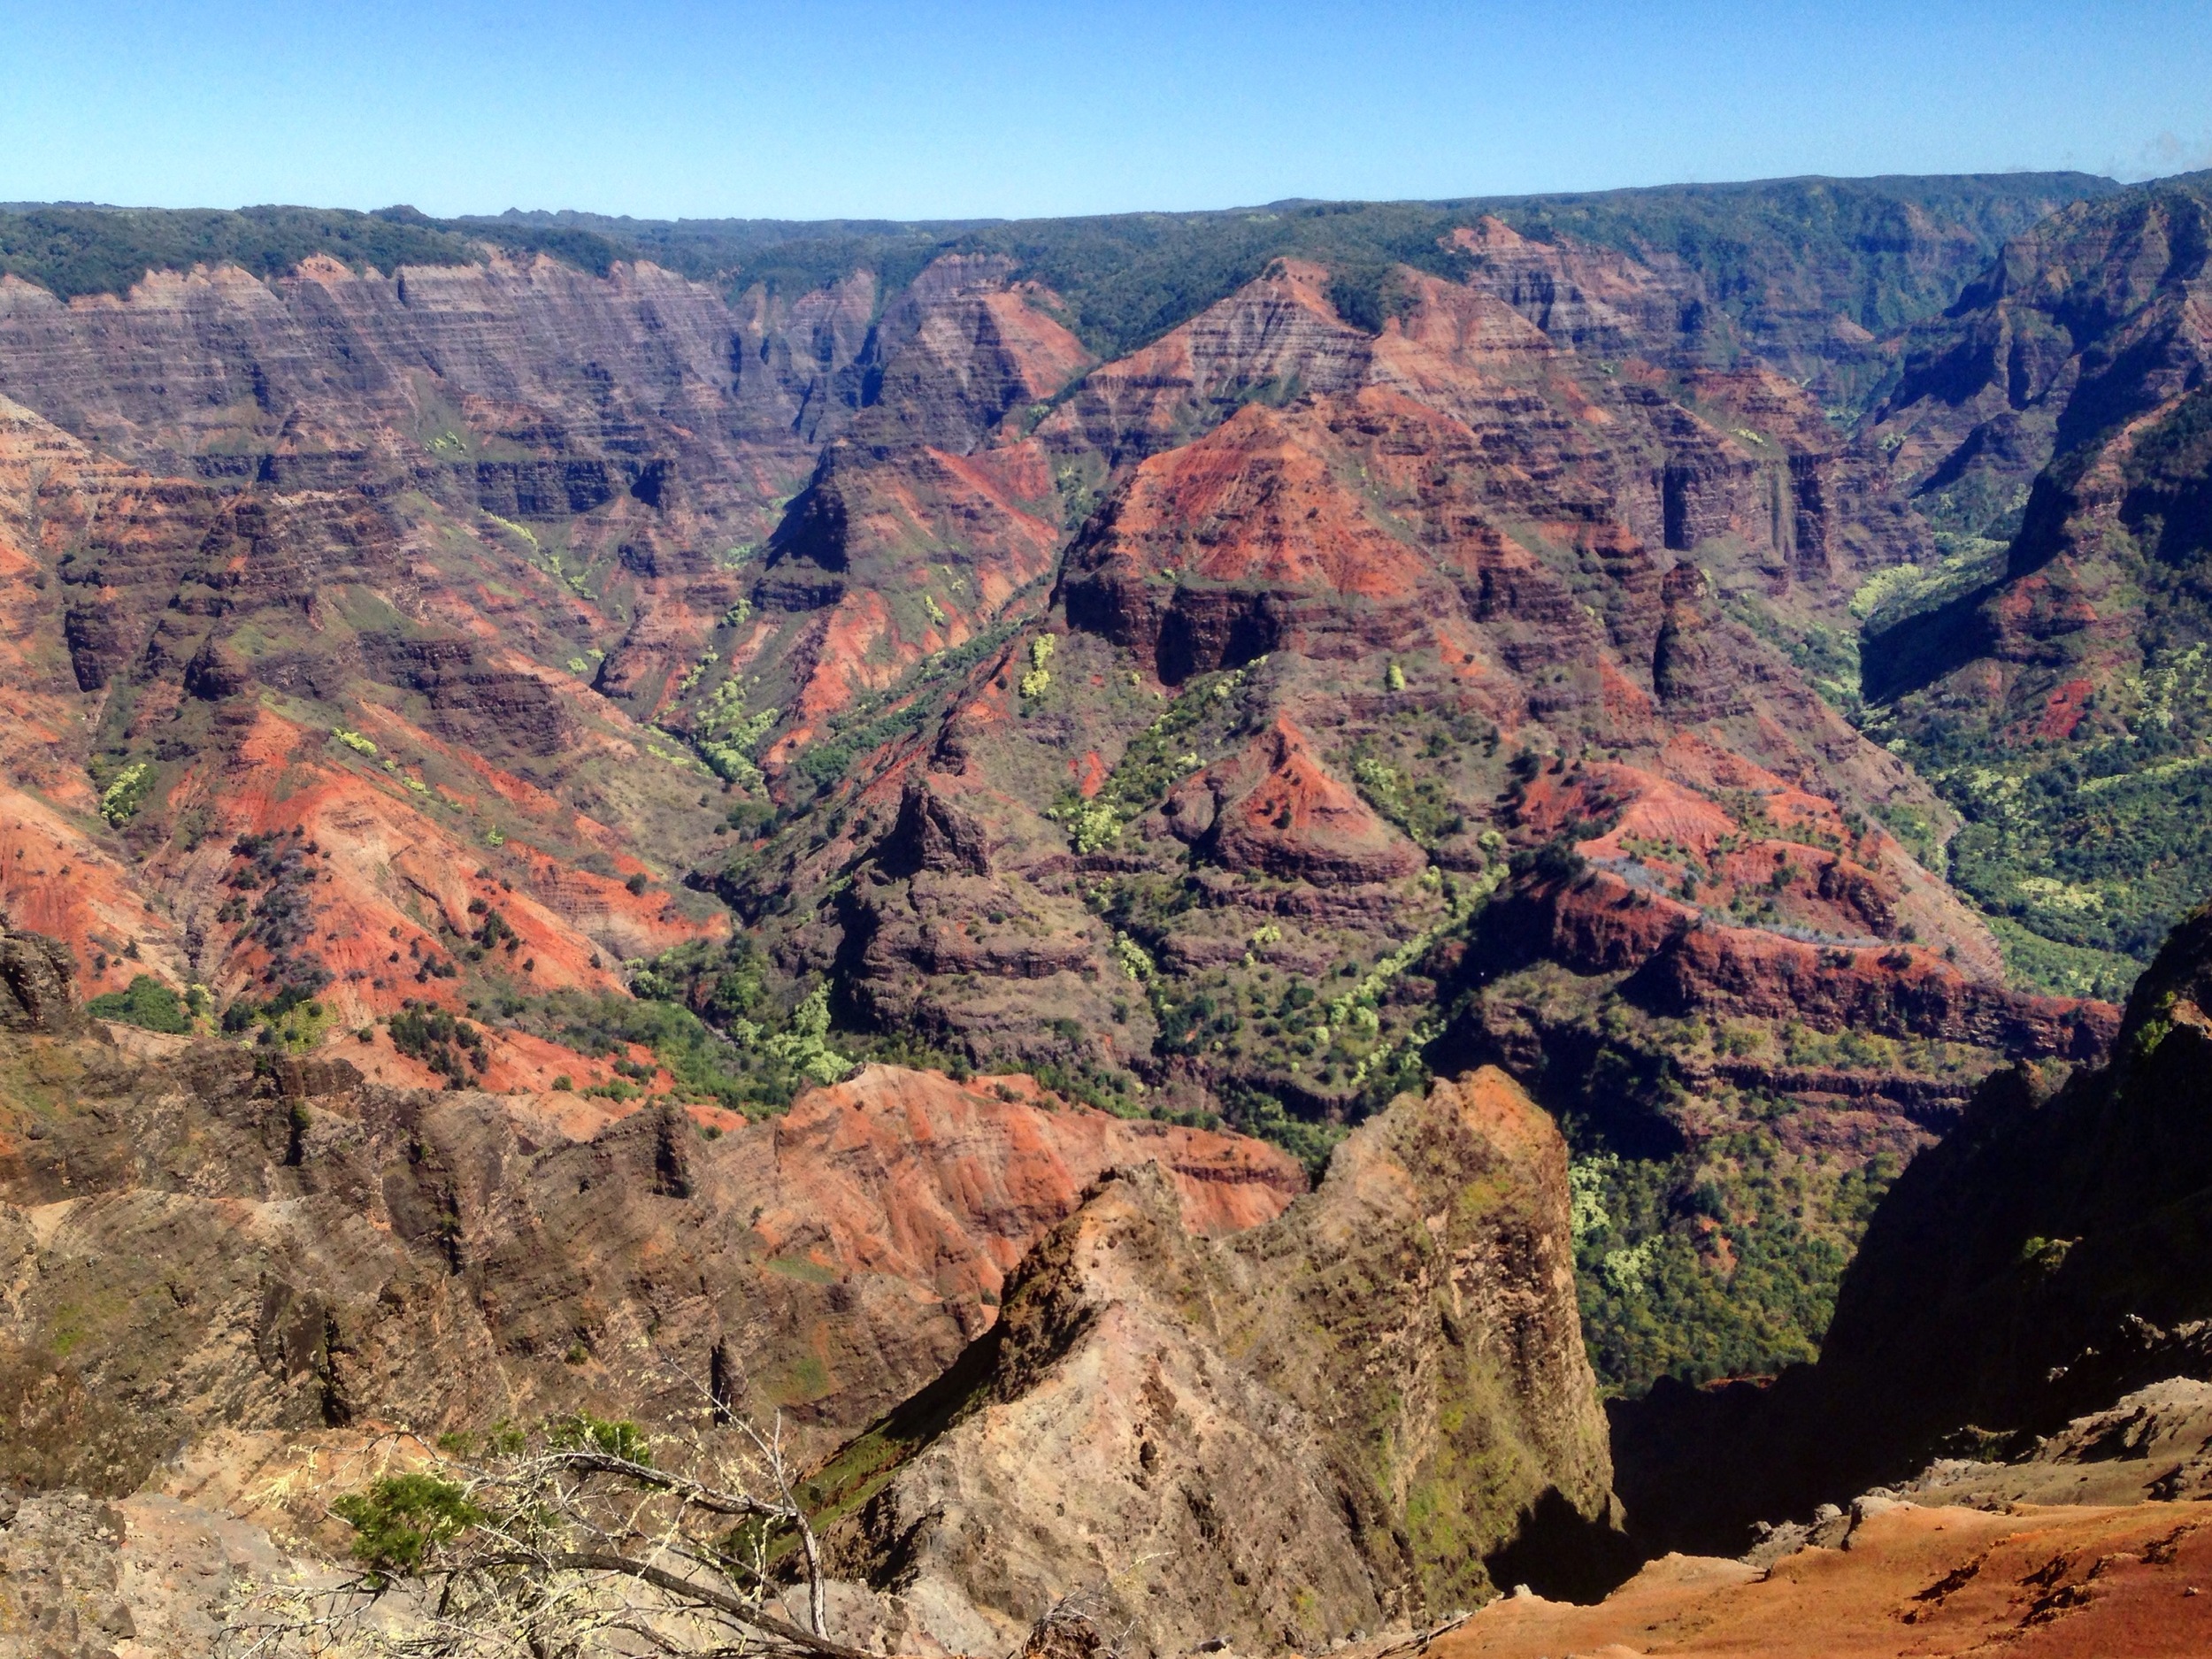
Day one of my Hawaii/New Zealand power tour brought me to Kauai's Waimea Canyon State Park, the commodious landmark that Mark Twain dubbed the Grand Canyon of the Pacific when he visited in the 1860s (although some dismiss this as an urban legend, saying Twain never made it to Kauai on his travels in Hawaii). I had originally planned to hit the ground running and hike the Kalalau trail out of the gate and do Waimea the following day as a recovery day of sorts, but I was battling jet lag and migraines and in the end decided to flip the days. In retrospect, it was a good decision.
Waimea (in traditional Grand Canyon fashion) is littered with park-and-walk overlooks which require about as much physical effort as going to the movies or riding a hover board to get your mail. In other words, you can get a lot of great views of the canyon without having to suffer for them, making the park ideal for the lazy, afflicted and those suffering from migraines, which I am at least one, if not all three at times.

The Canyon Trail. A great view for minimal work.
I took off for the park Saturday afternoon armed with a jug of water in my trunk and similarly sized bottle of sunscreen at my side. The park was about an hour's drive from where I was staying in Lihue, but the commute was pleasantly scenic. Even the blistering headaches did little to distract from the natural beauty of Kauai. Views of the endless ocean off the coast soon cede a climb into the hills, where a few spindly circuitous roads give you your first glimpse of the park.

One of the many park-and-walk viewpoints with Waipoo falls in sight.
There is no shortage of places to stop and admire the vast canyon as you enter the park, but that doesn't mean you shouldn't stop at one or all the viewpoints you encounter. I would often see locals pulled over on the shoulder of the road, eating lunch in their cars and taking in the view, impressing upon me that the grandeur of the park had not grown any less impressive to them. It really is an extraordinary landmark. Around ten miles long, three thousand feet deep and just under two thousand acres, pictures will never do this Kauai staple any sort of justice.

I think I'll sit awhile.
The main viewpoint for the park, simply called the Waimea Canyon Lookout, is a tourist heavy stop with concessions, bathrooms and guardrails blanketing every conceivable canyon ledge. Despite the glut of tourists and the honor guard of selfie sticks that comes with it, it is still worth a visit. It gives you what is arguably the best panoramic view of the park. While some of the alternative viewpoints offer you some unique views of the park, many of them are limited to narrow vistas and peripheral glances into the heart of the canyon. But the Canyon Lookout is your standard, vast, Grand Canyon photo opp. So, it's worth the stop if you can find parking in the lot. After you have sifted through the crowds and gotten your pictures though, I would advise pushing on down Kokee road (Hwy 550), where crowds lessen and your first opportunity to do some real hiking in the park becomes available.
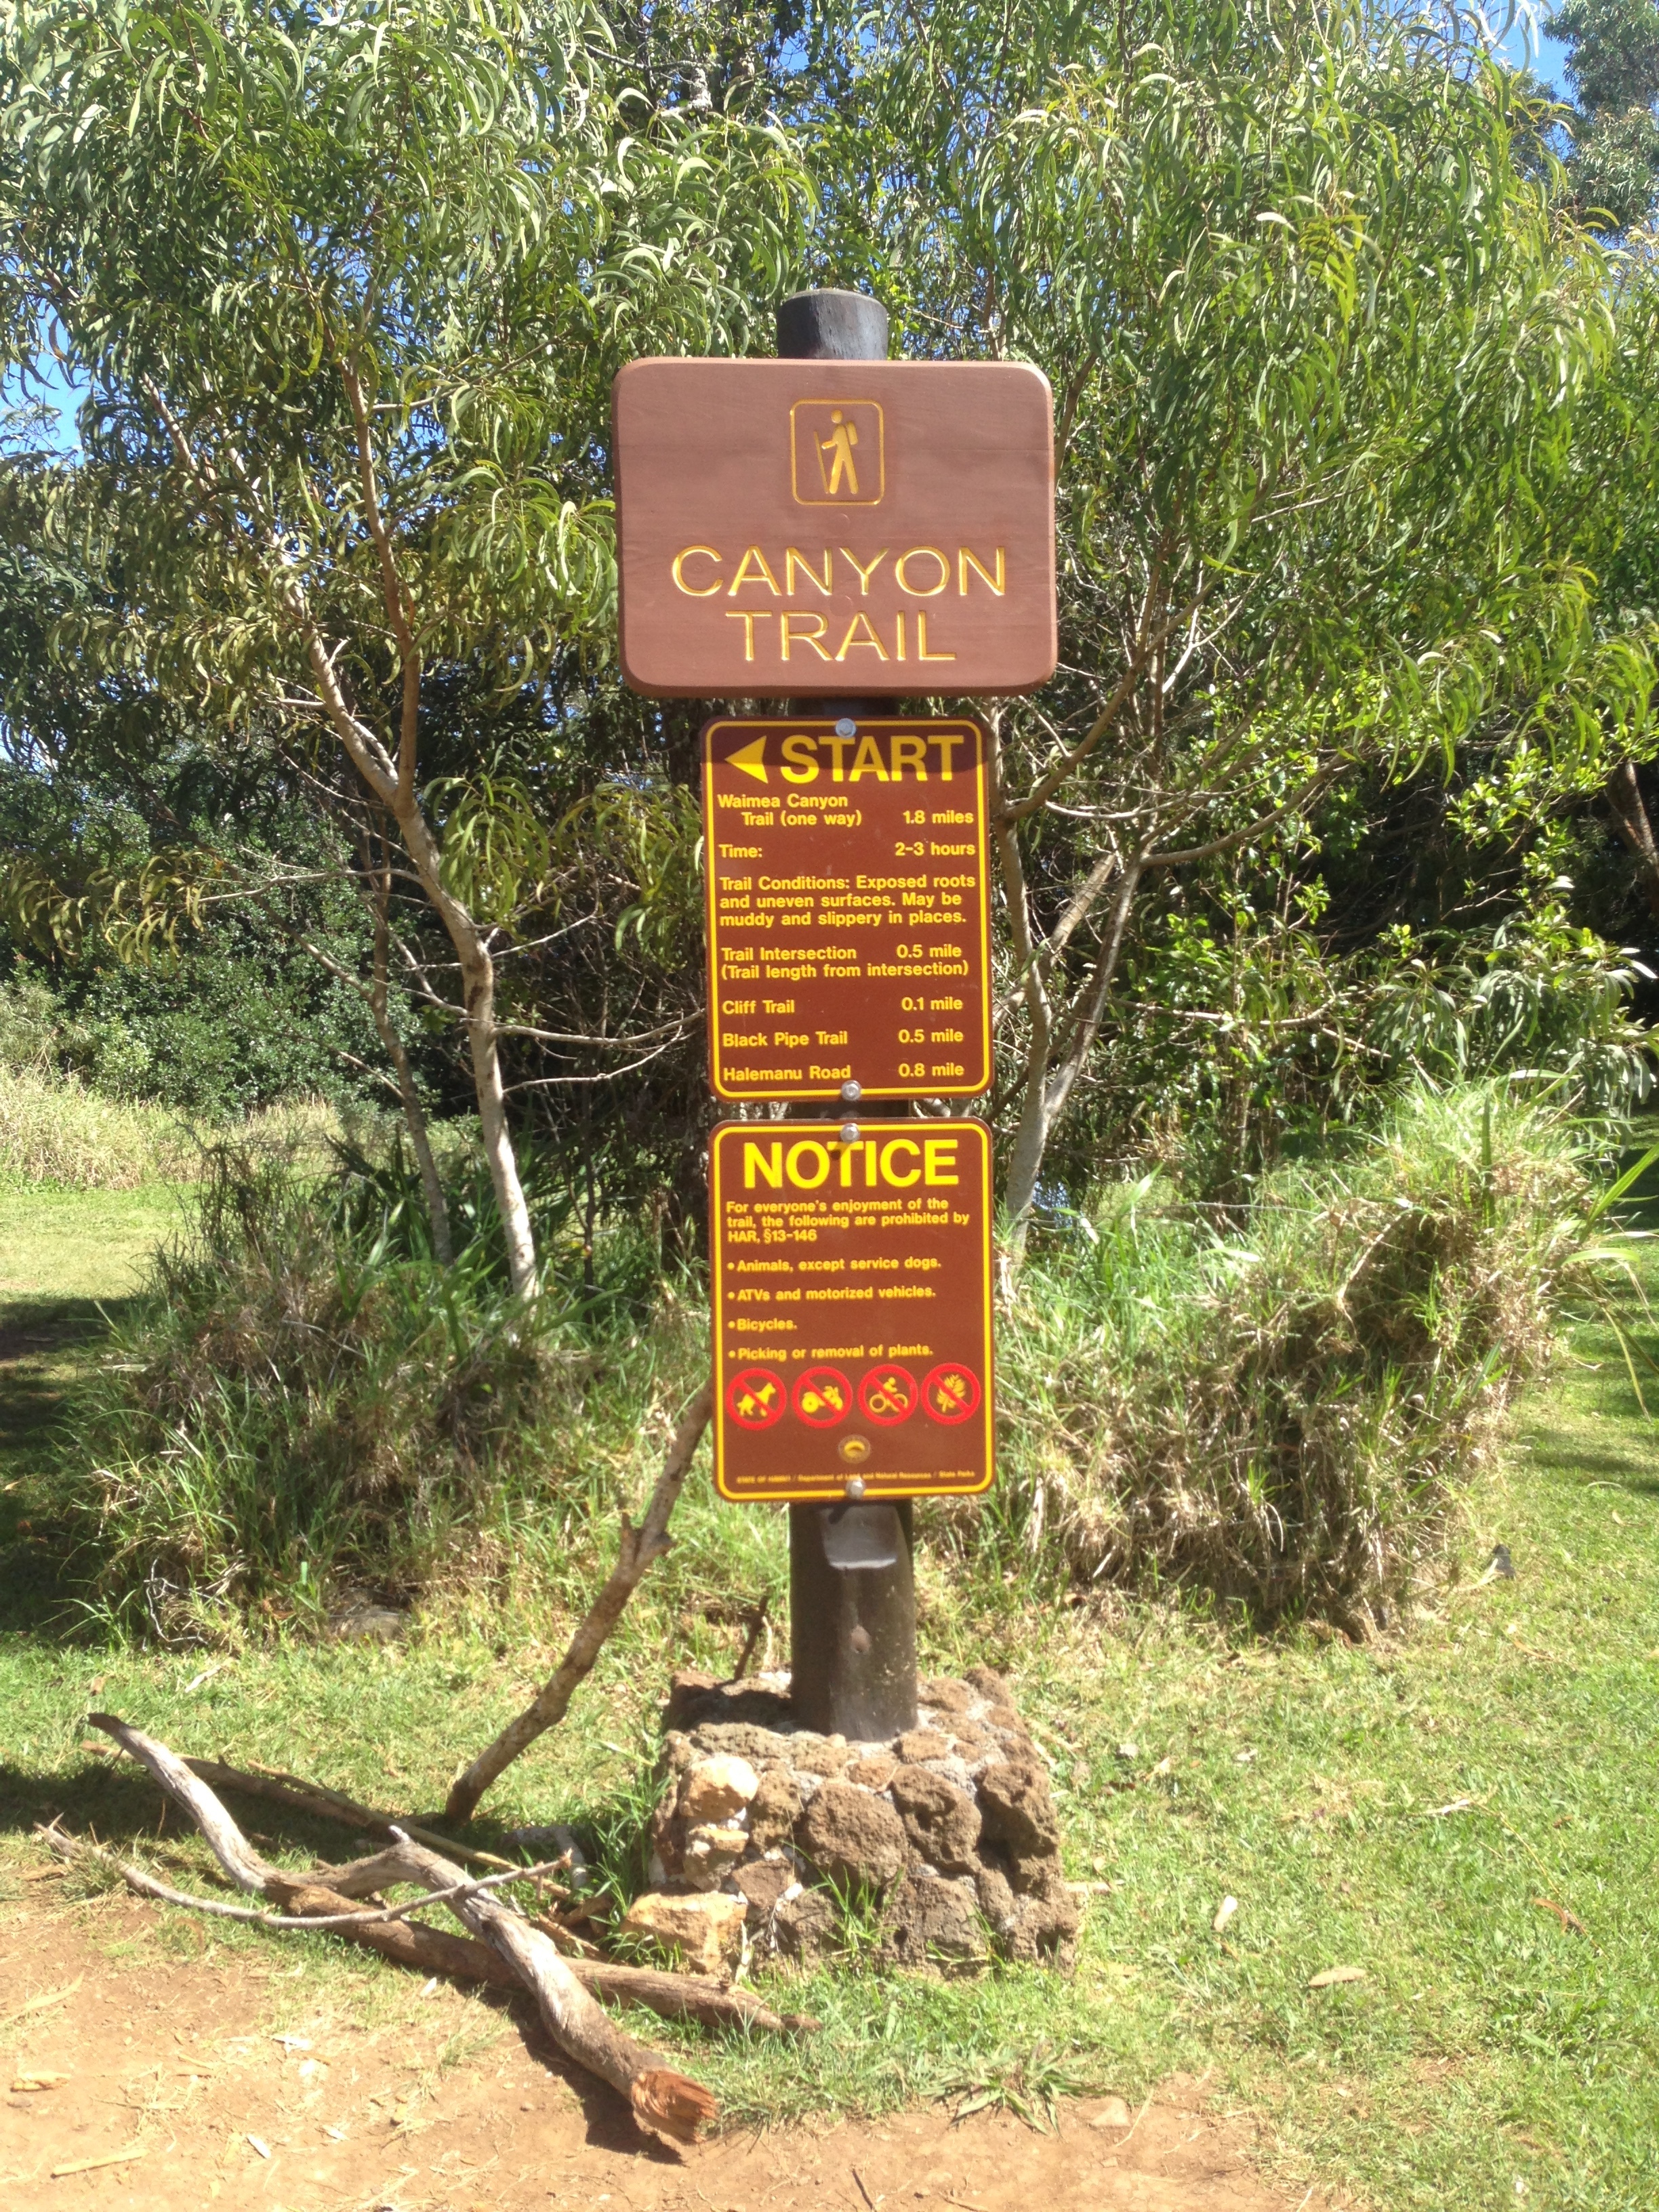
One such hike is the Canyon Trail, a (relatively) leisurely 3.6 mile trip to the crest of the Waipoo falls, a grand 800 foot waterfall that spills into the valley below. There is a little bit of elevation gain and loss on the trail, but nothing too extreme. Just grab some water and a good walking stick and you'll be good to go. I would highly recommend any park visitors give this trail a shot as it really presses into the valley and gives you some wonderful views of the canyon (below is a quick bit of video I shot while on the trail).
I didn’t make it to the back of the park where Waimea Canyon State Park turns into Koke'e State Park, but tucked into the northwest side of the island is the Awaʻawapuhi Trail, a three mile (six roundtrip) hike that provides some dangerous and dizzying views for the those who brave its narrow ledges. Also in the vicinity is the Kalalau Lookout which gifts visitors stunning vistas of the Na Pali Coast and allows Kalalau trampers to visualize a sliver of their ultimate goal, the famous Kalalau beach.
All in all, Waimea Canyon is alone worth the trip to Kauai, but as I quickly learned, it's just one of the many gems Hawaii's less packed 'Garden isle' contains. And another one of those gems was next on my list. On to the scenically dangerous Kalalau Trail!
Stray observations from Waimea Canyon Park:
I hope you like windy roads, because you’re going to get some windy roads.
Best way to explore the park: by helicopter
Second best way to explore the park if you can't afford a helicopter (like me): by car while singing the Jurassic Park theme.
My memory from this day is a little fuzzy, but was there a hot dog stand at the Waimea Canyon Lookout? If so, I endorse this despite its unabashed Americaness. It might have been a fruit stand or a migraine produced mirage though, so if you get up there with hotdogs on your mind and it's not there, I'm sorry.
I have not spent enough time on the other Hawaiian islands for proper comparison, but Kauai is an embarrassment of scenic riches.
WCSP is a helluva of a lunch spot, too. I am jealous.
Kauai is overrun with tourists from Chicago. I remember Chicago in February. I completely understand why they are here.
Despite being a fairly low stress park, there are still plenty of places to fall to your death. So, you know, no fancy footwork or questionable selfies around those ledges. The Canyon Trail is especially light on guard rails as you approach the Waipoo falls.
Gearing Up For New Zealand

Gear pile for the Southern Hemisphere.
I am officially geared up for my three weeks in New Zealand with a few new additions for the trip: trail running shoes, gopro stabilizer and the life straw are all fresh faces, but there are still a few old faithfuls (my dented North Face water bottle being the most staunch holdover of my gear). I have a quick weekend layover days in Kauai on the way where I'm hoping to hike some or all of the infamous Kalalau Trail in a day, so that plan accounts for all the trail running addition to my gear. I'm not normally big on trail running, but if you're going to finish 22 miles and 10,000 feet of elevation gain in a single day before the sun goes down, you're going to have to run a bit of the trail.
Official gear checklist (snaking left to right): Grid-it cord holder, Canon 40D, New Zealand guidebook, toiletries, Asolo hiking boots, GSI Halulite Microdualist cookset, emergency clif bar, Mountain House Rice and Chicken dehydrated meal, Just organic dehydrated peas, Just organic dehydrated mangos, Hoka Challenger ATR 2 trail running shoes, REI Trail 40 pack, passport plus Kiwi dollars, Feiyu G4 GoPro stabilizer, binoculars, GoPro harness, GoPro Hero 4, Emergency blanket, first aid kit, Fox Outfitters Microdry towel, pair of Petzel headlamps, hat, bandana, sunglasses, Life Gear emergency light, backup glasses, Seat to summit aeros pillow, sleeping bag, dry sack, tote, life straw, Vapur water bottle, beat up old North Face water bottle (the Rasputin of water bottles), Platypus 3L, Aircee trail running pack.
Return to Mailbox Part 4 - The Revenant

I decided to get my annual hike up Mailbox out of the way early this year instead of putting it off until summer. I’ve done Mailbox in winter and summer conditions and while they both have their own special brands of misery, I still prefer doing Mailbox in winter. The snow does a better job of breaking your falls and even gives you a built in excuse for falling so much, which I’ve always appreciated.
I don’t have much interest in hiking Mailbox in large crowds, so it was nice to see Mailbox open again on weekdays, even if it’s just until spring when they start paving Middle Fork road again. I’ve heard people had trouble finishing the new trail because of snow and downed trees, but I’ve yet to attempt the new trail and probably never will. I still stubbornly think the old trail is the way mailbox should be hiked and regard (quite unfairly I might add) the new trail as a bit of a chairlift equivalent of reaching the top. So, as always, it was back to the unforgiving old trail for the day.
You will encounter patches of snow and ice right as you leave the parking lot. At this point you can slap on your traction devices, but most of the slush will disappear before you reach the trailhead and really won’t make an appearance again until almost a mile into the hike. After that, traction devices (I know yaktracks are popular on the trails, but I feel like Mailbox really calls for microspikes, ice trekkers or crampons) and hiking poles become necessary as the snow and steep elevation gain makes for a difficult climb. The trail also has a few downed trees, especially in the first mile, but the path is generally well tread and easy to follow (if you do lose your bearings, as always try to follow the white diamonds on the trees as beacons for staying on the trail).

Seattle from afar.
The weather was great, but by the time I hit the boulder field, the temperatures took a nosedive and the wind started to howl. The scree was littered with ankle breaking posthole opportunities, so please be cautious when navigating this section. When I finally reached the top, the conditions were pretty brutal, but I did get a chance to sit down and check the mail. I was pleased to find no bills or jury summons, just booze and hand warmers. I didn’t linger too long at the top because of the conditions and headed back down soon after. Even with crampons and poles, the descent was a bit of a slip slide adventure.
All in all, Mailbox is not without its hardships and special brand of despair inducing grade, but I always find myself returning to its slopes. Great views, solid workout, no bills. Can’t ask for much more.
Hike log:
12:45pm – Left the car
3:25 – Reached the summit
3:45pm – Started back down
6:00pm – Made it back to the car with minimal bruising
Recommended reading for the trail: To Build a Fire
Soundtrack for the trail: The Revenant
Original post on WTA
Heybrook Lookout

I missed our annual New Year’s day hike this year because of work schedules, so today was the makeup date for our group. With the snow piled up in the mountains and a number of trails inaccessible or unstable at the moment, we decided to hike something simple and headed out to Heybrook Lookout. We unfortunately caught the tail end of this weekend’s clear skies, but fresh off seeing ‘The Revenant’, I didn’t mind the landscape looking similarly moody and providing a proper winter ambiance for the hike.
To echo the last few trail reports for the lookout, traction devices and hiking poles are highly recommended. You encounter crusty snow and ice almost immediately off the trailhead and even with the trail’s fairly modest and gradual elevation gain, it is still quite slippery. You can probably reach the lookout without poles or spikes, but I doubt you’ll be pleased with the way you look while doing it. Along with ice and snow, there are still a number of downed trees from the last few storms that you will need to maneuver around, but it’s nothing that can’t be passed with a few agility drills, clever planning or wide berths.
It started to flurry a bit by the time we hit the lookout and the staircase up is a bit of a hazard with ice blanketing the steps, but if you take your time, you can navigate them safely. The top of the lookout is locked and inaccessible, but you still get great views of Baring and Index from the false summit just below. It also provides a nice nook to sit and eat lunch while admiring the wonderful view.
All and all, Heybrook Lookout was a great warm up hike for the year. If you get out there early enough in the day, it's a quick excursion that you can pair up with any of its Highway 2 neighbors, especially Lake Serene. Serene, while certainly a beautiful trail in its own right, doesn't quite give you the panorama view that Heybrook provides, making the two a nice complimentary pair in close proximity.

An intimidating looking structure.
Either way, wherever you are heading this week, stay safe out there!
Recommended reading for the trail: Desolation Angels
Soundtrack for the trail: El Condor Pasa
Original post on WTA
Camp Muir Part 2 - If At first you don't succeed, just go hike Mount St. Helens

After some blistering forecasts this past weekend, we were lucky to catch perfect weather for heading up to Camp Muir. This was a pleasant surprise as lately we have run headfirst into some pretty gruesome weather on our hikes (I won’t name any names, but a certain Skamania County volcano may never be getting a Christmas card from me again).
We left paradise around 1:45pm. The Skyline Trail was bustling as always and was crowded until Glacier Vista, where the foot traffic generally tends to thin out. The marmots were out snacking in the meadows and while the wildflowers have paled, they still provide wonderfully scenic landscapes for your trip up the mountain.

When we broke off the Skyline Trail for Pebble creek, we heard some reports of crevasses opening up on the Muir snowfield. We didn’t end up encountering any of those troubling fractures, but supposedly they were appearing east of Muir, so keep your eyes out for those when making your ascent.
Even though we were heading up later in the day, the snow on the field wasn’t too soft. There were still some nice sets of stamped tracks to follow, which contributed heavily to making this hike more bearable. If you’re doing a lot of sloshing and slipping on the snowfield, it’s really going to take a toll on you. Evidence of which can be seen in the collection of tired, dazed souls taking refuge on the rocks, a feeling I know all too well from last year.
I was using poles and trail crampons for the snowfield, but you could probably get by kick stepping with poles if you forgot your traction devices or just want to look like an old pro. To reiterate every trail report ever on Muir, sunscreen, a good pair of sunglasses and an overabundance of water are essential on the snowfield (Having a GPS on an overcast or foggy day when the markers are harder to see is also a good idea).

We made Camp Muir by 6:00pm. Everyone at the camp looked pretty exhausted, but they were also pleasant and welcoming. I know it’s a regular commute for a lot of the guides and seasoned climbers, but I was excited to finally make it up there. This was a hike I’ve wanted to check off my list since I arrived in Washington. I probably won’t take a shot at the summit until next summer, but it was still an intoxicating feeling to be at 10,000 feet. I had a strong (and very ill-advised) desire to try to sneak into one of the departing summit teams and see how long it would take for them to notice and shoo me out of the towline.
It was getting late, so we didn’t linger too long and after some rest and light snacking, we headed back down. With the sheer exhaustion of the hike, glissading down the snowfield is always inviting, but our garbage bag diaper glissading provided mixed results and less than stylish summer looks. We made it back to the car by 8:45pm to round out a challenging but rewarding seven hours on the mountain.
Overall, this was not as excruciating as our first attempt at Muir and a big part of it was having proper gear, better conditioning and friendlier weather. Also, it was such a cakewalk compared to the death march that was Mount St. Helens. But I was proud of our group. Some of our team’s pre-hike conditioning for the week had been limited to beer and pontoon boats, but everyone made it to Muir and back in one piece, and no one threatened to quit nature or steal the keys and try to make a break for the car. Not even once.
I’m sure at some point I will take up more sedentary hobbies that don’t leave me hobbled the next day, but until then, the mountains remain a bit of an obsession. And to borrow an overused John Muir quote, “The mountains are calling and I must go.”
Recommended reading for the trail: Day Hiking Rainier
Soundtrack for the trail: Don't Stop Believing
Original post on WTA